
Gram staining - what (not) to do
- rachelpitt11
- Oct 16, 2023
- 1 min read
Updated: Nov 6, 2023


First, very briefly, where did Gram staining come from and what is it used for? Gram staining is a technique that has been around since the late 1800’s, pioneered by Hans Christian Joachim Gram from Copenhagen, Denmark in 1884. It is a staining technique that is relatively quick and inexpensive and can be applied to bacteria as a first step in identification.
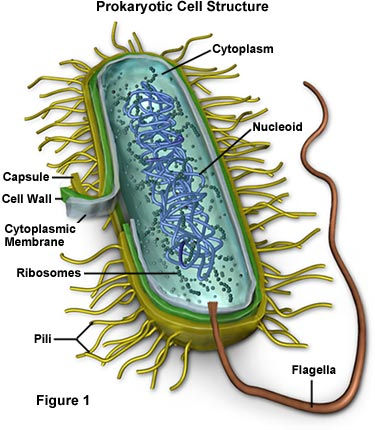
When staining the bacteria, we can tell differences in their cell walls, putting them into two groups. Bacteria either have a thick peptidoglycan cell wall without an outer membrane (the first group) or a thin peptidoglycan cell wall with a lipopolysaccharide outer membrane (the second group).

By applying two different dyes to the bacteria (see how below), the first group can be seen as dark purple, denoted Gram positive and the second group as pink, denoted Gram negative.
Here is a brief video about the technique:
Now, having made some silly mistakes myself while Gram staining, here is a more detailed guide of what to do, and maybe just as importantly, what not to do!
Procedure:
Prepping slides:

Preparation steps. | What not to do! |
1. Clean glass slide with ethanol and a Kim wipe and label with sample id. | Don’t forget to label slide – at least until stained, all samples look the same! |
2. Flame an inoculating loop to disinfect it, and add a drop of distilled water to fill the loop. | Don't add the water immediately - it will just evaporate..... |
3. Add about a dime sized blob of water on the slide. | Don’t use too much water – it will take a long time to air dry (and waiting is oh so tedious!) Don’t use too little, the bacteria won’t spread properly and may clump which can alter results. |
4. Flame the loop again, allow to cool, use loop to transfer a bit of bacteria to the water drop on the slide, spreading it through the water with the loop. | Don't use the loop until cool - this could burst the bacteria and cause them to change shape. |
5. Allow to air dry. | Don't try to speed this up - like using a hot loop, too much heat to dry will damage cell structure. |
6. Once dry, heat fix by passing slide at a 45 degree angle about 3" above Bunsen flame a few times. | Don't forget this step (yep, I forgot it twice in quick succession - I was tired!) If not heat fixed, the cells could just wash off and you only find this out at the end. |
Staining:

Staining steps | What not to do! |
1. With the slide flat on a rack over a staining tray, drop a few drops of crystal violet on the bacteria sample, enough to cover it. Wait 1 minute and then slant slide and rinse stain off with distilled water. | Don't get distracted and lose track of time! I did this too. After 2 minutes, the purple stain ended up very dark, but it did wash out of the Gram negative cells. Best to stick to 1 minute though just in case. Don't squirt the sample directly but let the water wash over it. Squirting it could dislodge cells. |
2. Add drops of iodine to cover the sample and wait another minute. This fixes the crystal violet stain into the bacteria (a mordant). Rinse with distilled water as above. | Don't miss this step - otherwise the crystal violet dye will be washed out for both Gram positive and Gram negative cells so they will all just look pink. |
3. Hold slide at an angle and drip ethanol above sample allowing it to run over sample. Ethanol is a decolorizer that removes the crystal violet from Gram negative bacteria where it isn't fixed.
Do this until no more stain runs or for 10 seconds, whichever is first. Immediately rinse with distilled water.
| The timing of this step is critical! Don't use too much or even the fixed crystal violet in the Gram positive cells will be washed out. Don't use too little or purple stain could remain in Gram negative cells. |
4. Add safranin to cover sample, and again, leave for 1 minute before rinsing with distilled water. This stains all cells, but those that are still purple don’t show it, whereas those washed clear do. | Not too much to go wrong with this step 😊 |
5. Carefully blot prepared slides in bibulous paper booklet to dry. | Don’t rub! Cells can still be removed! |
6. Dispose of liquid in tray according to lab instructions. | Don’t pour it down the sink! Don’t get it on your clothes either……your lab coat is your friend! |
Viewing slides:

Viewing steps | What not to do! |
1. Once prepared, your bacteria can be viewed under the microscope. Start with the 4X lens to find the sample and focus and then move up to the 10X lens, using fine focus adjustments if needed. | Don't move lenses by lens - use the nosepiece (the circular piece with lenses attached)! |
2. To see the bacteria properly, the 100X oil immersion lens is required (white ring). With the nosepiece turned so the slide is between the 10X and the 100X lens, use a blob of oil to cover the sample. Carefully turn the 100X lens into the oil. | Don't get oil on the 4X or 10X lenses! Oil can ruin them and they aren't cheap. |
3. Observe sample, noting color (pink or purple), morphology (shape/size) and clustering patterns. Are they all the same throughout? | Not really a don’t, but if both colors are seen, decide if the purple is in areas of dense cells – it may have just not washed off because the cells were too thick. Look at the areas of less dense cells. |
4. Clean the oil off the lens with lens paper. | Don’t get oil on the 4X or 10X lenses – did I mention this already?? |
Finally..... here are some of my examples of what you can see under the microscope - a whole miniature world!

Have fun and good luck with your Gram staining.......!
Comments