
Gram Staining Made Easy!
- Agai Kondi
- Apr 1, 2024
- 3 min read
Updated: Apr 9, 2024

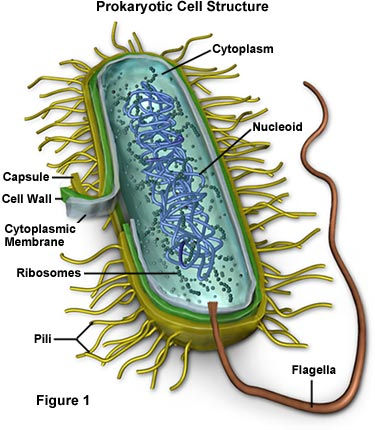
Gram staining is a technique used to divide a cell into two groups based on the cell's properties. The differences seen are due to the peptidoglycan layer in the cell wall, a gram positive cell will have a thick layer of peptidoglycan and will retain the crystal violet (purple stain) using iodine which enhances the binding of the stain to the cells. A gram negative cell has a thin layer of peptidoglycan, even with the iodine enhancing the binding with the crystal violet, the ethanol is able to decolorize. Gram positive cells should show up as purple and gram negative cells should show up as purple. Below is a step by step procedure in order to perform a successful Gram Stain!

Prepare microscope slide: Using an inoculation loop and a squeeze bottle, gently squeeze a drop of water into the ring of the loop, the surface tension of the water will form a small droplet inside the ring, then place that droplet on a clean slide

2. Sterilize the loop using a flame, allow the loop to cool down and gently use the loop to obtain a small sample of bacteria from your media, move the loop around the water droplet spreading out the droplet to a thin layer. Allow slide to air dry, DO NOT use flame to dry slide, it can cause your cells to explode.

3. Once microscope slide is completely dry, wave the microscope slide 3" above the flame a total of 3 times. This will heatfix the cell to the slide so they don't get rinsed off in the following steps. This step is crucial, if skipped you will lose all your cells and have nothing to view under microscope.

4. Using crystal violet stain and a dropper, cover the entire slide in the crystal violet stain, allow the crystal violet to sit on the slide for 60 seconds, then using your squeeze bottle full of water, rinse the crystal violet off trying to avoid spraying directly onto the cells.

5. Using the iodine and a dropper, cover the entire slide with iodine, allow the iodine to sit on the slide for 60 seconds, then using the squeeze bottle rinse the iodine off, avoid spraying water directly onto the cells

6. Timing on this step is crucial, too much time will lead to over decolorization can occur causing gram negative cells to show up as gram negative, at the same time, under decolorization can occur which will cause gram negative cells to show up as positive. Using the ethanol and a dropper, hold the slide at an angle so the ethanol will drip off. Drop ethanol onto the slide, keep an eye on the purple running off the slide in the drops of ethanol, this step is finished when there is no more purple dripping off the slide or 10 seconds of dripping, whichever
comes first. Once complete place slide on
rack and drown with water to stop decolorization
then pour water off the slide

7. Using safranin stain (pink) and a dropper, cover the slide with the safranin stain, allow the stain to sit on the slide for 60 seconds, this is a counterstain since the ethanol should have decolorized all the Gram negative bacteria and not the Gram positive, the lighter pink color will not be visible on the Gram positive, only the Gram negative. Rinse off the safranin stain with the squeeze bottle

8. Almost done! Using bibulous paper, place the wet microscope slide inside the bibulous paper, this will dry off the excess water and stain. This is a good time to clean up your Gram stain materials and obtain a microscope to view the slide you prepared from start to finish!
By Agathokli Kondi
Comments