
Making Serial Dilutions: Counting the Uncountable
- elm1096
- Oct 30, 2025
- 3 min read
Updated: Nov 7, 2025
When I first learned about serial dilutions in our antibiotic discovery lab, I was amazed that microbiologists can measure something as tiny and numerous as bacteria using just pipettes, sterile water, and patience. A serial dilution is a way to take a concentrated sample, like a scoop of soil, and dilute it step by step so that we can actually count the microbes growing inside it.
It sounds simple, but this technique is the foundation of so many experiments, from finding new antibiotics to checking bacterial contamination in food or water.

Here’s how to do it with a soil sample:
Step 1. Label and Prepare
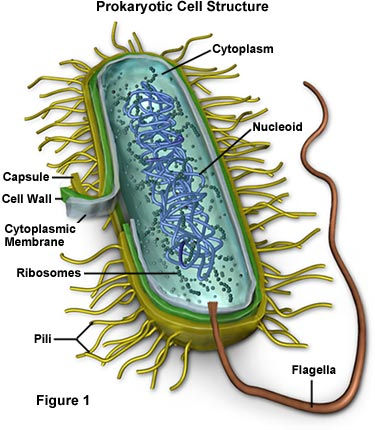
Start by labeling five sterile glass tubes as 10⁻¹, 10⁻², 10⁻³, 10⁻⁴, and 10⁻⁵, plus a stock tube labeled with your soil sample ID and date. Its very important to label carefully as one mix-up can ruin your whole dilution series.
Step 2. Make the Stock Solution
Measure out about 1 gram of your soil sample into a 15 mL conical vial, then add 10 mL of sterile water. After shaking to mix, this will become your stock suspension, which is basically a microbial soup straight from the soil.
Step 3: Prepare the Dilution Tubes
Each of the five tubes will get 900 µL of sterile water. This setup lets you create a 1:10 dilution with each step. Precision matters here as tiny volume errors can change the concentration by a lot.
Step 4: Perform the Serial Dilutions
Using a micropipette, transfer 100 µL of the stock into the 10⁻¹ tube and mix it by flicking the bottom (the “finger vortex” technique).
For each dilution:
Use a fresh tip to take 100 µL from the previous tube.
Add it to the next labeled tube (e.g., from 10⁻¹ → 10⁻², then 10⁻² → 10⁻³, and so on).
Mix the tube gently before moving on.Continue until you’ve transferred from 10⁻⁴ → 10⁻⁵. Each transfer makes the sample ten times more diluted.
Each step makes the sample ten times more dilute than the last. By the end, we will have a gradient from “crowded” to “countable.”
Step 5: Plate the Dilutions
Label five LB agar plates with your initials, date, soil ID, and dilution number. Then pipet 100 µL from each tube onto its matching plate and use sterile hockey stick spreader to evenly distribute the sample. The plates are incubated at 26 °C for 24–48 hours.
Step 6: Observe the Plates
After incubation, the pattern is clear: the 10⁻¹ plate is covered in bacterial growth, while the subsequent dilutions have fewer and fewer colonies. The 10⁻⁵ plate often has just a few distinct colonies which is perfect for isolating pure cultures later.

Counting Colonies:
Now comes the satisfying process to see the math of dilutions come to life in visible dots of bacteria. To calculate bacterial concentration, we first choose the plate with 20–250 colonies, since this range gives the most accurate and reliable count. Plates with fewer than 20 colonies may not represent the sample well, and plates with more than 250 are too crowded to distinguish individual colonies.
Once the best plate is chosen, we count the colonies and use the formula:

This gives the colony-forming units per milliliter (CFU/mL) which is an estimate of how many viable bacterial cells were present in the original sample.
Percent Producers:
After identifying which colonies produced zones of inhibition against the ESKAPE tester strains, we calculated the percentage of antibiotic producers. To find this, divide the number of colonies that showed inhibition by the total number of colonies tested, then multiply by 100:

This percentage shows how many isolates from the original sample were capable of producing antibiotic compounds.


Comments