
A Step-by-Step Guide to Gram Staining
- aa16858
- Apr 19
- 2 min read
Updated: Apr 22
Gram staining is really important technique used to classify bacteria based on their cell wall structure. This technique allows researchers to distinguish between Gram-positive and Gram-negative bacteria.
Purpose of Gram Staining
This Gram staining is used in microbiology to differentiate bacteria into two major groups:
Gram positive bacteria: they appear purple because they have a thick peptidoglycan layer in their cell wall.
Gram negative bacteria: they appear pink they have a thinner peptidoglycan layer and an outer membrane in their cell wall.

Steps of the Gram Staining Protocol:
Prepare the bacterial smear
Using a sterile loop, place a small drop of water on a clean glass slide, then add a small amount of your bacteria, mix them well, and spread the sample. Next, let the smear air dry.
Heat Fixation
In order to kill the bacteria and ensure they adhere to the surface, pass your slide quickly through the flame to fix them on your glass slide.
Crystal Violet (primary stain)
Cover your slide with 3-4 drops of Crystal Violet and wait for 1 minute. This stains all of your bacteria purple.
Iodine (Mordant)
Cover your slide with 3-4 drops of Iodine and wait for 1 minute. This helps trap the stain inside the cells as Iodine binds to Crystal Violet.
Alcohol (Decolorization)
Add a few drops of a decolorizing agent to your slide and wait for a maximum of 10 seconds. This step removes the stain from Gram-negative bacteria only.
Safranin (Counterstain)
Cover your slide with 3-4 drops of Safranin and wait for a minute. Gram-negative bacteria take up this stain and appear pink, while Gram-positive remain purple.
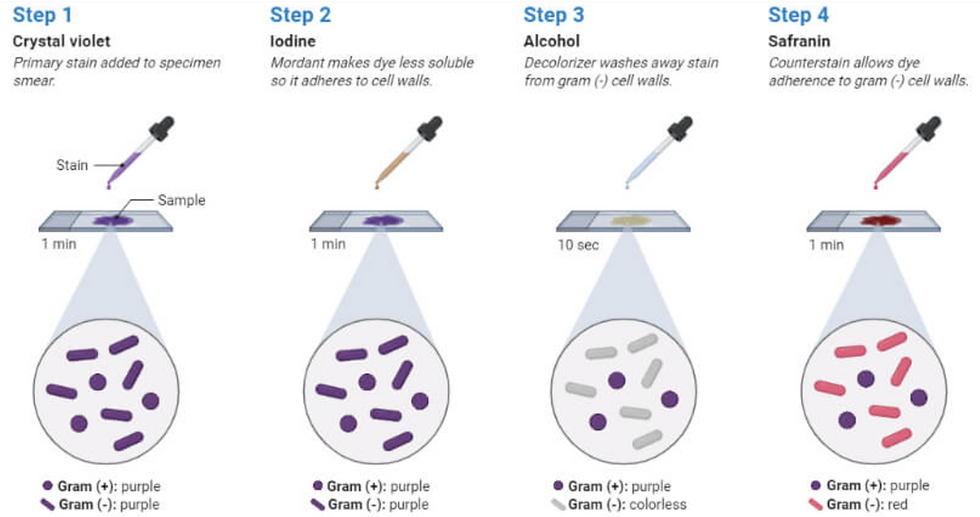
The Results:
Dry you slide using bibulous paper, then place it under the microscope for 100x oil immersion viewing.
What you should expect to see: Gram positive bacteria appear purple under the microscope, while Gram negative bacteria appear pink under the microscope.

Comments